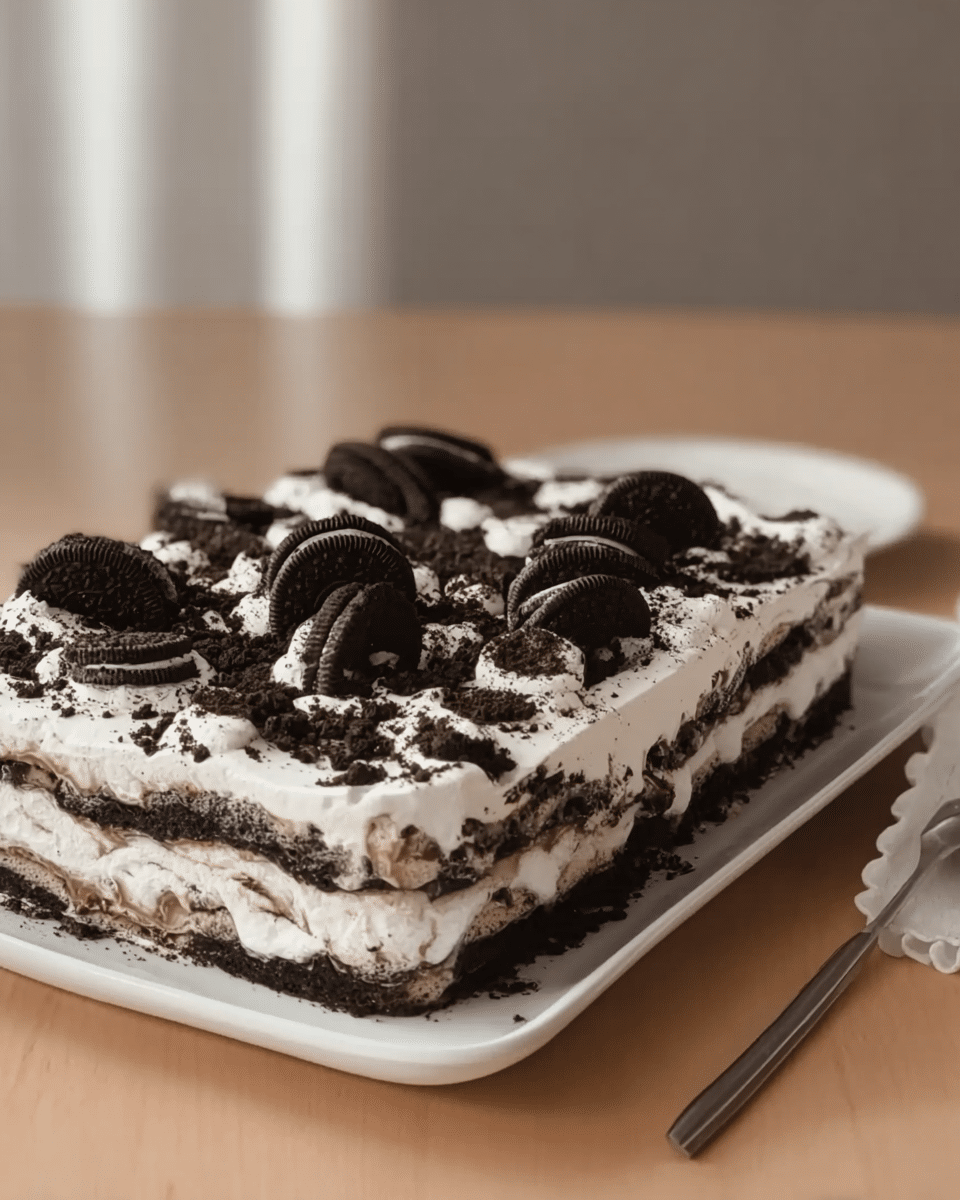
Tired of complicated desserts that leave your kitchen looking like a disaster zone? This No Bake Oreo Icebox Cake is about to become your new secret weapon. With just a handful of ingredients and zero oven time, this creamy, dreamy layer cake delivers maximum flavor with minimum effort.
Hi, I’m Emma, the heart behind GusRecipes, and this No Bake Oreo Icebox Cake recipe holds a special place in my heart. I first created it for my daughter’s summer birthday when it was too hot to turn on the oven, and it’s been a family favorite ever since. The way the cookies soften into cake-like layers while the cream firms up is nothing short of magical!
In this guide, I’ll walk you through everything from ingredient selection to assembly tricks, storage tips, and creative variations to make this icebox cake your own. Ready for a dessert that impresses without the stress? Let’s dive in!
Why This No Bake Oreo Icebox Cake Recipe Works
- Uses simple, readily available ingredients you probably already have
- Requires just 15 minutes of active prep time
- Perfect for hot summer days when you don’t want to use the oven
- Can be made 1-2 days ahead for stress-free entertaining
- Adaptable for different flavor preferences and dietary needs
- Ideal for both casual family desserts and special occasions
Choosing the Right Ingredients for No Bake Oreo Icebox Cake
Best Cookie Options for This Recipe
Original Oreos create the classic black and white visual effect and perfect chocolate flavor balance. However, don’t be afraid to experiment with flavored Oreos like Mint, Golden, or Birthday Cake for unique variations. Look for cookies that have a firm texture that will soften nicely when layered with cream.
Cream Selection Tips
Heavy whipping cream with at least 36% fat content whips up best for stability. For an even more stable structure, consider adding 8 ounces of softened cream cheese or mascarpone to your whipped cream. This adds richness and helps the cake hold its shape when sliced.
Substitutions and Alternatives
If you’re looking to accommodate dietary restrictions, try:
- Gluten-free Oreo-style cookies for gluten sensitivities
- Dairy-free whipped topping and plant-based cream cheese for lactose intolerance
- Reduced-fat cream cheese to lighten up the calorie count slightly
No Bake Oreo Icebox Cake Ingredients & Prep
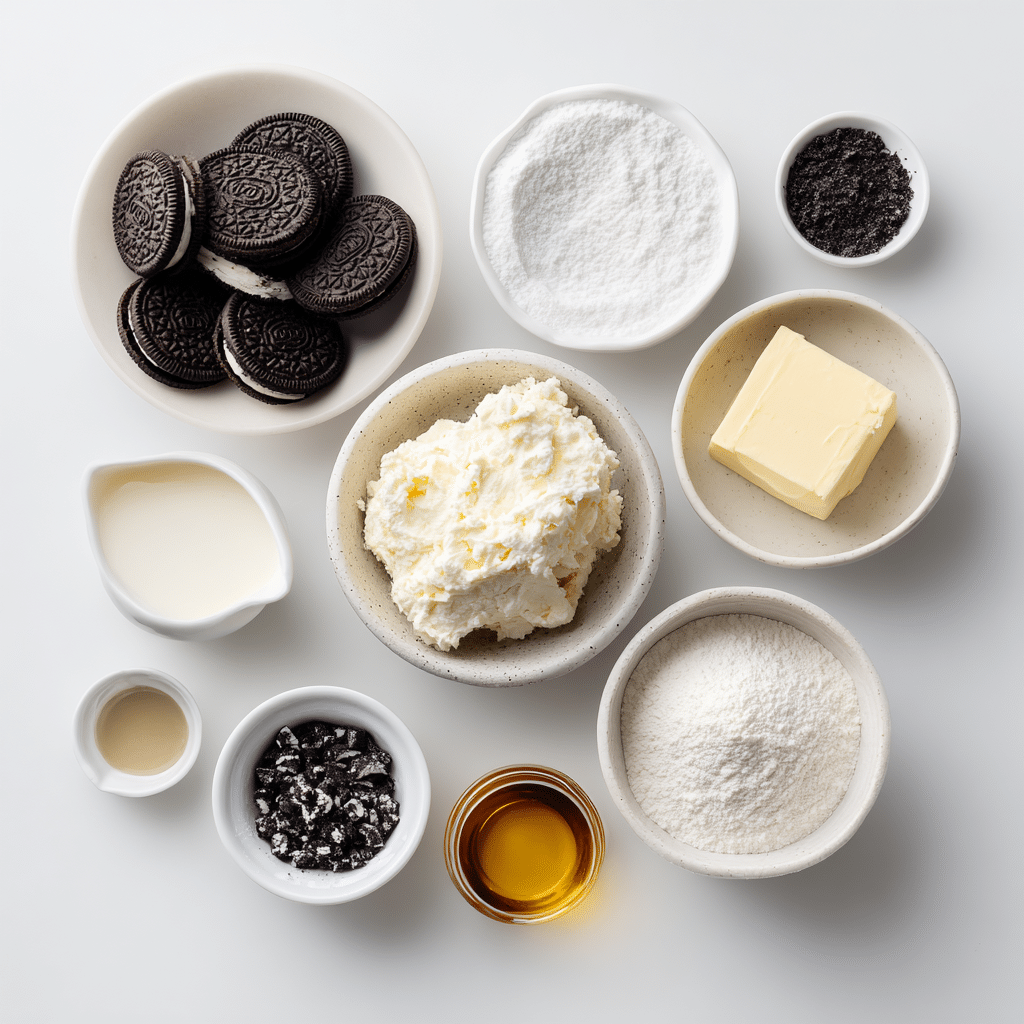
Essential Ingredients
- 36-40 Oreo cookies
- 3 cups heavy whipping cream
- ⅓ cup powdered sugar
- 2 teaspoons vanilla extract
- ¼ teaspoon salt
- Optional: 8 oz cream cheese, softened (for extra stability)
- Optional: 2 tablespoons cocoa powder (for chocolate whipped cream layers)
Preparation Basics
- Whipped Cream Prep: Chill your mixing bowl and beaters in the freezer for 10 minutes before whipping cream for maximum volume.
- Cookie Handling: No need to remove the cream filling from Oreos – use them whole for the best flavor and texture.
- Pan Selection: An 8×8 or 9×9 square pan creates perfect layers, but you can also use a springform pan for an elegant presentation.
Step-by-Step No Bake Oreo Icebox Cake Instructions
Pre-Cooking Preparation for No Bake Oreo Icebox Cake
- Line your pan with parchment paper or plastic wrap, leaving overhang on all sides for easy removal.
- In a chilled bowl, whip heavy cream until soft peaks form.
- Add powdered sugar, vanilla extract, and salt, then continue whipping until stiff peaks form.
- If using cream cheese, beat it separately until smooth, then fold into the whipped cream mixture.
Assembly Method for No Bake Oreo Icebox Cake
- Arrange a single layer of whole Oreo cookies on the bottom of your prepared pan, breaking some cookies to fill gaps if needed.
- Spread approximately 1/4 of the whipped cream mixture evenly over the cookies.
- Repeat the layers of cookies and cream 3 more times, finishing with a layer of cream on top.
- For decoration, crush 2-3 Oreos and sprinkle the crumbs over the top layer of cream.
Setting Process for No Bake Oreo Icebox Cake
- Cover the pan with plastic wrap without touching the top cream layer.
- Refrigerate for at least 6 hours, but preferably overnight (12-24 hours).
- As it chills, the cookies will absorb moisture from the cream, softening to a cake-like texture.
Serving Tips for No Bake Oreo Icebox Cake
- Use the parchment paper overhang to carefully lift the cake from the pan.
- With a sharp knife dipped in hot water and wiped dry, cut clean slices.
- For the prettiest presentation, freeze the cake for 30 minutes before slicing, but serve cold, not frozen.
Looking for more no-bake dessert inspiration? Check out my Pinterest page for beautiful dessert ideas that will satisfy your sweet tooth without turning on the oven!
Pro Tips for Perfect No Bake Oreo Icebox Cake
Avoiding Common Mistakes
- Prevent soggy cake: Don’t over-soak the cookies before assembly – they’ll naturally soften in the refrigerator.
- Ensure stable cream: Whip the cream until stiff peaks form, but be careful not to over-whip into butter.
- Create clean slices: Dip your knife in hot water between cuts for restaurant-worthy presentation.
Tool Recommendations
- Stand mixer or hand mixer with whisk attachment for perfect whipped cream
- Offset spatula for smooth, even cream layers
- Straight-sided pan for clean edges
- Cake lifter or wide spatula for easy transfer to serving plate
Storage & Make-Ahead Options
- Make ahead: This cake actually improves with 12-24 hours of refrigeration
- Refrigerator storage: Cover tightly and store for up to 3 days
- Freezer option: Freeze whole or in slices for up to 1 month in airtight container
Flavor Variations for No Bake Oreo Icebox Cake
Chocolate Lover’s Dream
- Add 2 tablespoons cocoa powder to the whipped cream mixture
- Drizzle chocolate ganache between layers and on top
- Incorporate chocolate chips into the cream layers
Fruity Twist
- Add a layer of sliced strawberries or raspberries between cookie layers
- Mix 2 tablespoons of strawberry preserves into the whipped cream
- Garnish with fresh berries on top
Coffee Infusion
- Dissolve 1 tablespoon instant espresso powder in 1 tablespoon hot water, cool, then fold into cream
- Use coffee-flavored Oreos if available
- Dust top with cocoa powder and cinnamon
| Variation | Key Ingredients | Special Instructions | Best Served With |
|---|---|---|---|
| Classic | Original Oreos, vanilla whipped cream | Follow base recipe | Fresh berries |
| Mint Chocolate | Mint Oreos, vanilla whipped cream | Add few drops of mint extract to cream | Chocolate sauce |
| Peanut Butter | Original Oreos, vanilla whipped cream | Add 1/2 cup peanut butter to cream | Chopped peanuts |
| Birthday Cake | Birthday Cake Oreos, vanilla whipped cream | Fold in 1/4 cup sprinkles | Extra sprinkles |
Serving Suggestions for No Bake Oreo Icebox Cake
- Perfect pairings: Serve with fresh berries, chocolate sauce, or caramel drizzle
- Beverage companions: Cold milk, hot coffee, or a dessert wine like Moscato
- Special touches: Add a scoop of vanilla ice cream on the side for extra indulgence
- Occasion ideas: Perfect for summer gatherings, birthdays, or anytime you need a make-ahead dessert

FAQs About No Bake Oreo Icebox Cake
Q: Can I make this cake without dairy products?
A: Yes! Use dairy-free whipped topping and dairy-free cream cheese alternative. Many Oreo varieties are already dairy-free (check packaging).
Q: How far in advance can I make this cake?
A: For best results, make it 12-24 hours before serving. It can be stored in the refrigerator for up to 3 days.
Q: My whipped cream won’t hold stiff peaks. What went wrong?
A: Your cream might be too warm. Chill the bowl and beaters, use cold cream, and consider adding 1 tablespoon of instant pudding mix as a stabilizer.
Q: Can I use different cookies?
A: Absolutely! Graham crackers, chocolate chip cookies, or butter cookies all work well, though the texture and flavor will vary.
Conclusion
This No Bake Oreo Icebox Cake is the perfect example of how simplicity often leads to the most delicious results. With just a few ingredients and some patience while it sets, you’ll create a dessert that has everyone asking for the recipe. The combination of creamy layers and softened cookies creates a texture that’s somewhere between cake, pudding, and cheesecake truly the best of all dessert worlds!
I’d love to see your creations! Tag @GusRecipes on social media or leave a comment below about how yours turned out. And if you’re looking for more easy, crowd-pleasing desserts, be sure to check out my collection of no-bake treats that will keep your kitchen cool and your sweet tooth satisfied all year long!
Grab those Oreos and get layering creamy bliss awaits!
Print
No Bake Oreo Icebox Cake: 5 Easy Steps to Creamy Bliss
- Total Time: 6 hrs 15 mins
- Yield: 8 servings 1x
- Diet: Vegetarian
Description
A classic no-bake Oreo icebox cake made with layers of chocolate sandwich cookies and fluffy whipped cream simple, nostalgic, and irresistibly delicious.
Ingredients
2 packages Oreo cookies
2 cups heavy whipping cream
1/2 cup powdered sugar
1 tsp vanilla extract
1/4 cup milk
Chocolate shavings or crushed Oreos for topping
Instructions
1. In a large bowl, whip heavy cream, powdered sugar, and vanilla until stiff peaks form.
2. Spread a thin layer of whipped cream on the bottom of a baking dish.
3. Dip Oreos quickly into milk and arrange in a single layer over the cream.
4. Spread whipped cream over cookies.
5. Repeat layers of dipped Oreos and whipped cream until ingredients are used, ending with cream.
6. Cover and refrigerate for at least 6 hours or overnight.
7. Top with chocolate shavings or crushed Oreos before serving.
8. Slice and serve chilled.
Notes
Letting the cake chill overnight gives the best cake-like texture.
You can add a layer of chocolate ganache for extra richness.
Store covered in the refrigerator for up to 3 days.
- Prep Time: 15 mins
- Cook Time: 0 mins
- Category: Dessert
- Method: No-Bake
- Cuisine: American
Nutrition
- Serving Size: 1 slice
- Calories: 430
- Sugar: 28g
- Sodium: 260mg
- Fat: 26g
- Saturated Fat: 15g
- Unsaturated Fat: 9g
- Trans Fat: 0g
- Carbohydrates: 46g
- Fiber: 2g
- Protein: 4g
- Cholesterol: 85mg
Keywords: no bake oreo cake, oreo icebox cake, easy dessert, no bake dessert