
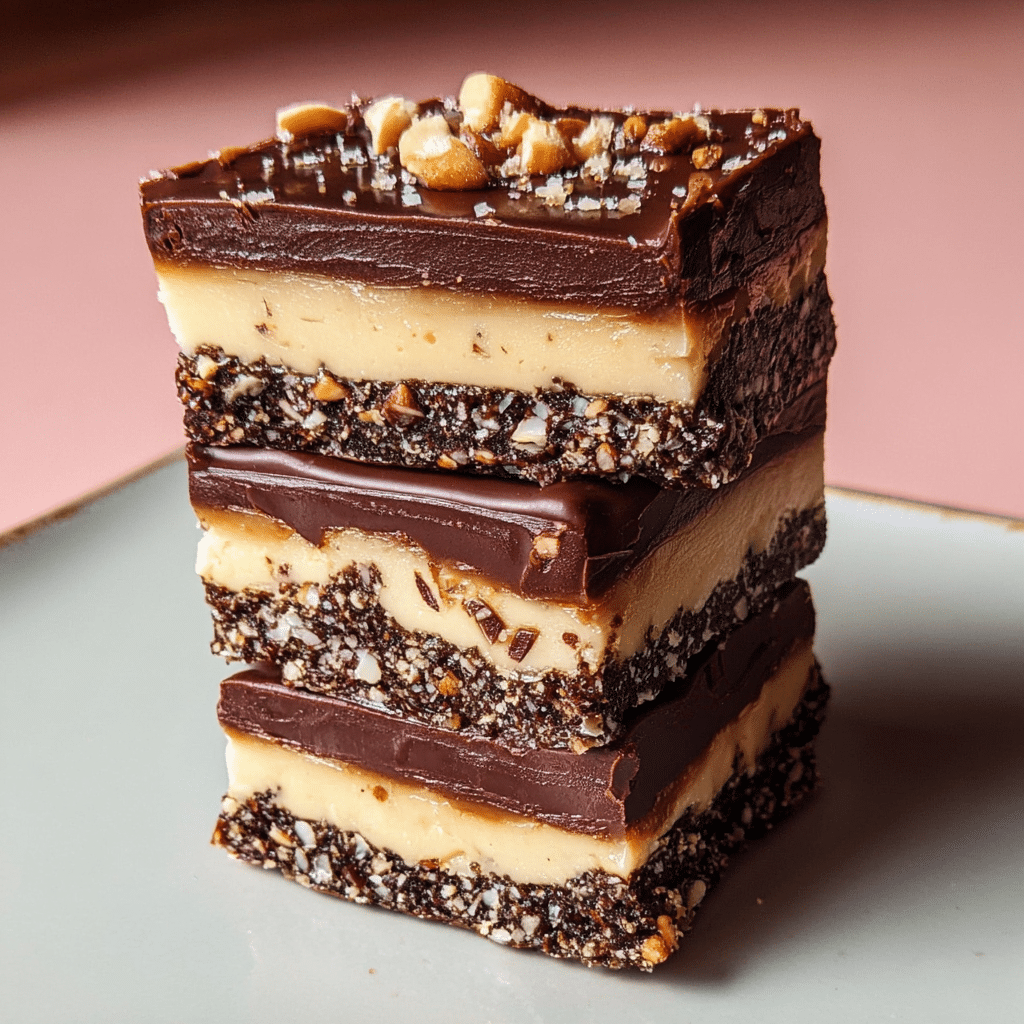
Are you tired of desserts that lack that perfect balance of texture and flavor? Nanaimo bars offer the ultimate solution with their irresistible three-layer composition that delivers a chocolate-coconut base, creamy custard middle, and glossy chocolate top. These no-bake treats deliver a perfect harmony of crunch, creaminess, and rich chocolate that will transform your dessert experience.
As someone who’s been crafting Canadian desserts for over a decade, I’ve perfected this iconic recipe through countless test batches and historical research. The Nanaimo bar isn’t just a dessert it’s a piece of Canadian cultural heritage that I’m excited to share with you.
In this guide, you’ll discover the fascinating history behind Nanaimo bars, essential ingredient tips, a foolproof preparation method, and creative variations to make this classic your own. Let’s dive into Canada’s most beloved sweet sensation!
Why These Nanaimo Bars Recipe Works
- Uses simple, accessible ingredients found in most grocery stores
- No baking required perfect for hot summer days
- Versatile enough for casual family desserts or elegant dinner parties
- Make-ahead friendly actually improves after chilling overnight
- Perfectly balanced sweetness with multiple texture layers
Choosing the Right Ingredients for Nanaimo Bars
Best Ingredients for Authentic Nanaimo Bars
The quality of your Nanaimo bars depends entirely on your ingredients. For the chocolate coating, use high-quality semisweet or dark chocolate (70% cocoa solids) for the richest flavor. Graham cracker crumbs should be finely ground for the perfect base texture, and unsweetened shredded coconut provides better texture than sweetened varieties.
Buying Tips for Nanaimo Bars Ingredients
Look for Bird’s custard powder for the middle layer – it’s traditional and creates that signature yellow color and unique flavor. If you can’t find it locally, you can order it online or substitute with vanilla pudding mix plus a drop of yellow food coloring. Choose unsalted butter for better control over the final flavor profile.
Substitutions for Nanaimo Bars Components
If you’re looking for alternatives, you can swap graham crackers for digestive biscuits for a more traditional British-Canadian approach. For a nut-free version, replace almonds or walnuts with additional graham cracker crumbs. Vegans can use plant-based butter and find dairy-free chocolate to adapt this classic.
Ingredients & Prep for Perfect Nanaimo Bars
Nanaimo Bars Base Layer Essentials
- ½ cup unsalted butter
- ¼ cup granulated sugar
- 5 tablespoons cocoa powder
- 1 large egg, lightly beaten
- 1¾ cups graham cracker crumbs
- 1 cup shredded coconut
- ½ cup finely chopped almonds
Nanaimo Bars Custard Filling Ingredients
- ½ cup unsalted butter, softened
- 3 tablespoons heavy cream
- 2 tablespoons custard powder
- 2 cups powdered sugar
Nanaimo Bars Chocolate Topping
- 4 ounces high-quality semisweet chocolate
- 2 tablespoons unsalted butter

Step-by-Step Nanaimo Bars Instructions
Pre-Cooking Prep for Nanaimo Bars
- Line a 9×9-inch baking pan with parchment paper, leaving overhang on the sides for easy removal.
- Measure all ingredients for each layer before beginning to ensure smooth preparation.
- Bring the butter for the middle layer to room temperature for easy beating.
Cooking Method for Nanaimo Bars Base
- In a double boiler, melt ½ cup butter, sugar, and cocoa powder, stirring until smooth.
- Slowly add the beaten egg, stirring constantly until the mixture thickens (about 2-3 minutes).
- Remove from heat and stir in graham cracker crumbs, coconut, and chopped nuts.
- Press the mixture firmly and evenly into the prepared pan and refrigerate for 20 minutes.
Filling Method for Nanaimo Bars
- Beat the softened butter until fluffy using an electric mixer.
- Mix custard powder with cream until smooth, then add to the butter.
- Gradually incorporate powdered sugar until creamy and smooth.
- Spread filling evenly over the chilled base and return to refrigerator for 15 minutes.
Topping Application for Nanaimo Bars
- Melt chocolate and butter in a double boiler or microwave in 20-second intervals.
- Stir until completely smooth and slightly cooled.
- Pour over the chilled middle layer and gently tilt the pan to create an even layer.
- Refrigerate for at least 2 hours or until the chocolate is set.
Pro Tips for Perfect Nanaimo Bars
Avoiding Common Nanaimo Bars Mistakes
- Don’t rush the chilling process between layers patience ensures clean cuts and distinct layers
- Use a warm knife for cutting (run under hot water and wipe dry) to prevent the top chocolate layer from cracking
- Allow the chocolate topping to cool slightly before spreading to prevent melting the custard layer
- For clean squares, freeze bars for 15 minutes before cutting
Tool Recommendations for Nanaimo Bars
- Offset spatula for perfectly smooth layers
- Straight-edged 9×9-inch pan for classic square bars
- Parchment paper with overhang for easy removal
- Bench scraper or large sharp knife for clean cuts
Storage & Serving for Nanaimo Bars
- Store in an airtight container in the refrigerator for up to one week
- For longer storage, freeze cut bars in a single layer, then transfer to a container with parchment between layers
- Serve slightly chilled but not ice-cold for the best texture and flavor
- Allow frozen bars to thaw in the refrigerator for 2-3 hours before serving
Looking for more delicious Canadian-inspired desserts? Check out my Pinterest collection for more sweet inspiration! Follow me on Pinterest for weekly recipe updates and baking tips.
Flavor Variations for Nanaimo Bars
Mint Nanaimo Bars
- Add ½ teaspoon mint extract to the middle layer
- Use mint chocolate for the top layer
- Garnish with crushed candy canes during holiday season
Mocha Nanaimo Bars
- Add 1 tablespoon instant espresso powder to the base layer
- Mix 1 teaspoon coffee extract into the middle layer
- Sprinkle with chocolate-covered coffee beans before the top layer sets
Seasonal Nanaimo Bars
- Orange: Add orange zest to middle layer and base
- Cranberry: Mix dried cranberries into the base for a holiday twist
- Maple: Replace some sugar with maple syrup in the filling for a Canadian touch
| Variation | Base Modification | Filling Modification | Topping Modification |
|---|---|---|---|
| Classic | Standard recipe | Custard powder | Semisweet chocolate |
| Mint | Add mint extract | Add green food coloring | Use mint chocolate |
| Mocha | Add espresso powder | Add coffee extract | Sprinkle with cocoa |
| Orange | Add orange zest | Add orange extract | Add orange zest garnish |
| Maple | Standard | Replace some sugar with maple syrup | Drizzle with maple syrup |
Serving Suggestions for Nanaimo Bars
- Pair with a strong cup of coffee to balance the sweetness
- Serve alongside fresh berries for a refreshing contrast
- Add a scoop of vanilla ice cream for an indulgent dessert
- Cut into mini squares for an elegant dessert platter
- Garnish with a light dusting of cocoa powder or gold edible glitter for special occasions
FAQs About Nanaimo Bars
Can I make Nanaimo Bars ahead of time?
Absolutely! Nanaimo bars actually improve after 24 hours of chilling as the flavors meld together. They can be made up to a week in advance and kept refrigerated.
Why is my middle layer not firm enough?
This usually happens when the butter is too soft or there’s too much cream. Make sure to use room temperature (not melted) butter and measure the cream precisely. Refrigerate longer if needed.
Can I freeze Nanaimo Bars?
Yes! Nanaimo bars freeze beautifully for up to 3 months. Cut them first, then freeze in a single layer before transferring to a container with parchment between layers.
Where did Nanaimo Bars originate?
Nanaimo bars are named after the city of Nanaimo in British Columbia, Canada. The earliest published recipe appeared in the 1952 Women’s Auxiliary of the Nanaimo Hospital Cookbook, though similar desserts existed earlier under different names.
Conclusion
Nanaimo bars have rightfully earned their place as Canada’s beloved dessert sensation, combining rich chocolate, creamy custard, and a textured coconut-chocolate base into one irresistible treat. Their no-bake nature makes them accessible to bakers of all skill levels, while their elegant appearance belies how simple they are to prepare.
I hope this guide inspires you to bring a taste of Canadian heritage into your kitchen! The joy of sharing these iconic bars with friends and family is unmatched especially when you’ve made them yourself.
Join thousands of home bakers who’ve fallen in love with this classic recipe, and don’t forget to tag @GusRecipes in your creations! For more Canadian-inspired treats, check out our Strawberry Cheesecake Dump Cake guide next!
Print
How Nanaimo Bars Became Canada’s Sweetest Dessert Sensation
- Total Time: 2–3 hours
- Yield: 16 squares 1x
- Diet: Vegetarian
Description
Classic Canadian dessert with a layered structure: chocolatey base, creamy custard middle, and a rich chocolate topping.
Ingredients
Base Layer:
1/2 cup unsalted butter, melted
1/4 cup granulated sugar
5 tbsp unsweetened cocoa powder
1 large egg, beaten
1 3/4 cups graham cracker crumbs
1 cup shredded coconut
1/2 cup chopped walnuts
Middle Layer:
1/2 cup unsalted butter, softened
2 tbsp custard powder
2 tbsp milk
2 cups powdered sugar
Top Layer:
4 oz semi-sweet chocolate
2 tbsp unsalted butter
Instructions
1. Preheat oven to 350°F (175°C). Mix melted butter, sugar, cocoa, and beaten egg. Stir in graham cracker crumbs, coconut, and walnuts. Press into greased 8×8-inch pan. Chill in fridge.
2. Beat butter, custard powder, milk, and powdered sugar until smooth. Spread over chilled base.
3. Melt chocolate and butter together. Spread evenly over custard layer.
4. Refrigerate until firm (2–3 hours). Cut into squares before serving.
Notes
Use custard powder or substitute with instant vanilla pudding mix.
Can toast coconut and walnuts for extra flavor.
Keep refrigerated until serving.
- Prep Time: 20 mins
- Cook Time: 0–5 mins
- Category: Dessert
- Method: No-bake
- Cuisine: Canadian
Nutrition
- Serving Size: 1 square
- Calories: 250
Keywords: Nanaimo bars, layered dessert, no-bake dessert