Ever found yourself staring at a flat, dull red velvet cake wondering where you went wrong? Those vibrant photos from recipe blogs seem impossible to achieve in your own kitchen. I’ve been there too! As the baker behind GusRecipes, I’ve spent countless hours perfecting the art of red velvet baking, transforming from frustrated novice to confident creator.
My red velvet blossoms journey began after three consecutive baking disasters that left me with cakes more brown than red and about as moist as cardboard. Through persistence and experimentation, I discovered the subtle techniques that make all the difference. Today, I’m sharing my 10 game-changing secrets that will elevate your red velvet treats from ordinary to extraordinary.
In this guide, I’ll walk you through choosing the perfect ingredients, mastering the signature color, achieving that tender crumb, and creating cream cheese frosting that perfectly complements these iconic treats. Whether you’re a first-time baker or looking to perfect your technique, these tips will transform your red velvet experience!
Why These Red Velvet Blossoms Secrets Work
- Uses everyday pantry staples with just a few specialty ingredients
- Techniques that take only minutes but transform your results dramatically
- Perfect for both weeknight treats and special occasion showstoppers
- Scientifically-proven methods that enhance flavor and texture
- Versatile tips applicable to cakes, cupcakes, cookies, and more
Choosing the Right Ingredients for Red Velvet Blossoms
Best Flour Options
The foundation of perfect red velvet blossoms starts with the right flour. Cake flour creates the most tender crumb due to its lower protein content, resulting in that melt-in-your-mouth texture red velvet is famous for. If you only have all-purpose flour, you can create a substitute by replacing 2 tablespoons per cup with cornstarch and sifting thoroughly.
Cocoa Selection Matters
Traditional red velvet blossoms require natural cocoa powder (not Dutch-processed) for two crucial reasons: it reacts with acidic ingredients to create lift, and its natural reddish undertones enhance the signature color. Using Dutch-processed cocoa will neutralize the necessary acid reaction and result in a duller color and denser texture.
Quality Colorants
For vibrant red velvet blossoms, gel food coloring provides concentrated color without adding excess liquid to your batter. Look for food-grade colors labeled “no-taste” to avoid any artificial aftertaste. For natural alternatives, beet powder can provide a more subtle red hue when used in larger quantities.
Ingredients & Prep for Red Velvet Blossoms
Essential Techniques
- Room temperature ingredients: Allow butter, eggs, and buttermilk to sit at room temperature for 1 hour before mixing
- Proper measuring: Use the spoon and level method for dry ingredients rather than scooping directly with measuring cups
- Sifting: Always sift dry ingredients to eliminate lumps and ensure even distribution of leavening agents
Red Velvet Marinade Magic
- Buttermilk + vinegar: Creates the perfect acidic environment
- Vanilla extract: Balances the subtle chocolate notes
- Natural cocoa powder: Enhances the red color while providing depth
- Gel food coloring: Delivers vibrant color without affecting texture
Pantry Must-Haves
- Fine granulated sugar: Dissolves more readily than coarser varieties
- Vegetable oil: Creates moisture that butter alone cannot achieve
- Cream cheese: Philadelphia brand delivers the most consistent results for frosting
- Cake flour: Lower protein content creates the signature tender crumb
Step-by-Step Red Velvet Blossoms Baking Instructions
Pre-Baking Red Velvet Blossoms Prep
- Position your oven rack in the center position and preheat to exactly 350°F (175°C).
- Prepare your pans by greasing thoroughly, then lining with parchment paper.
- Sift all dry ingredients separately before incorporating them into your wet mixture.
- Ensure all refrigerated ingredients have reached room temperature to prevent curdling.
Red Velvet Blossoms Mixing Method
- Cream butter and sugar until noticeably lighter in color and fluffy in texture (3-5 minutes).
- Add eggs one at a time, incorporating fully between additions.
- Combine vinegar with buttermilk and let sit for 5 minutes to activate.
- Alternate adding dry ingredients and buttermilk mixture, beginning and ending with dry ingredients.
- Mix on low speed only until just combined overmixing activates gluten and toughens the crumb.
Red Velvet Blossoms Doneness Check
- Insert a toothpick into the center it should come out with a few moist crumbs, not wet batter.
- The edges should pull slightly away from the pan.
- The center should spring back when lightly pressed with a fingertip.
- For cupcakes, bake 18-22 minutes; layer cakes require 25-30 minutes.
Red Velvet Blossoms Cooling Process
- Allow cakes to cool in pans for exactly 10 minutes any longer and they may become soggy.
- Remove from pans and transfer to wire racks for complete cooling.
- Wait until completely cool before frosting approximately 2 hours for standard cakes.
- For the most vibrant color and developed flavor, wrap cooled layers in plastic and refrigerate overnight.
Pro Tips for Perfect Red Velvet Blossoms
Avoiding Common Red Velvet Mistakes
- Never substitute baking soda for baking powder they react differently with acidic ingredients.
- Avoid overfilling pans (2/3 full maximum) to prevent overflow and ensure even rising.
- Use gel food coloring instead of liquid to maintain proper batter consistency.
- Always add cocoa powder to your sifted dry ingredients rather than mixing it with food coloring to prevent clumps.
Essential Red Velvet Baking Tools
- Digital kitchen scale: Ensures precise measurements for consistent results
- Offset spatula: Creates smooth, professional-looking frosting finishes
- Silicone spatula: Gently folds ingredients without deflating air bubbles
- Cake strips: Prevents domed centers for perfectly level layers
Red Velvet Blossoms Storage Guidelines
- Room temperature: Store in airtight container up to 2 days
- Refrigerated: Keeps fresh for up to 1 week (bring to room temperature before serving)
- Freezing unfrosted layers: Wrap tightly in plastic wrap, then aluminum foil for up to 3 months
Looking for more inspiration? Check out my Pinterest board where I share stunning red velvet creations and step-by-step visual guides!
Red Velvet Blossoms Flavor Variations
Classic Twists
- Cream cheese filling: Create a surprise center by hollowing cupcakes and filling with cream cheese mixture
- Chocolate ganache drip: Add sophisticated contrast to traditional cream cheese frosting
- Raspberry infusion: Fold fresh raspberries into batter or create a raspberry filling between layers
Dietary Adaptations
- Gluten-free option: Replace cake flour with 1:1 gluten-free baking blend plus ¼ teaspoon xanthan gum
- Reduced sugar version: Decrease sugar by up to ¼ cup and increase vanilla extract by ½ teaspoon
- Dairy-free alternative: Substitute coconut milk + 1 tablespoon apple cider vinegar for buttermilk
Global Flavor Inspirations
| Variation | Key Ingredients | Special Technique | Best For |
|---|---|---|---|
| Mexican Spice | Cinnamon, cayenne | Add with dry ingredients | Layer cakes |
| Italian Mascarpone | Mascarpone cheese | Replace half the cream cheese | Cupcakes |
| French Vanilla | Bean paste | Add to wet ingredients | Whoopie pies |
| Middle Eastern | Rose water, pistachios | Sprinkle nuts on top | Sheet cakes |
Serving Red Velvet Blossoms Suggestions
- Pair with beverages: Serve alongside cold milk, hot coffee, or Earl Grey tea
- Temperature matters: For the best flavor experience, serve at just slightly cooler than room temperature
- Garnish options: Fresh berries, chocolate curls, or candied pecans enhance presentation
- Plating for impact: Dust plates with cocoa powder before placing slices for restaurant-quality presentation
- Accompaniments: A small scoop of vanilla bean ice cream creates perfect temperature and texture contrast
Red Velvet Blossoms FAQs
Q: Why did my red velvet cake turn out brown instead of red?
A: This typically happens when using Dutch-processed cocoa, which neutralizes the acids needed for the red reaction. Always use natural cocoa powder and sufficient food coloring.
Q: Can I make red velvet blossoms without food coloring?
A: Yes! Try 2 tablespoons of beet powder or puree for a natural alternative, though the color will be more burgundy than bright red.
Q: Why did my cream cheese frosting become runny?
A: This happens when cream cheese or butter is too warm. Chill ingredients before mixing and refrigerate frosting for 30 minutes if it becomes too soft.
Q: How can I intensify the red color without adding more food coloring?
A: Add 1 tablespoon of white vinegar to your batter, which brightens the red pigments, and ensure you’re using natural cocoa powder, not Dutch-processed.
Conclusion
Red velvet blossoms don’t have to be intimidating or mysterious anymore! With these 10 secrets, you’re equipped to create bakery-worthy treats that will impress family and friends. Remember that the magic happens in the details room temperature ingredients, proper measuring, the right cocoa, and patience during mixing.
I’d love to see your red velvet creations! Share your baking victories and questions in the comments below. Over 3,000 home bakers have transformed their red velvet results using these techniques, and you can too. For more baking inspiration, check out my other popular recipes and guides.
Happy baking!
Print
Red Velvet Blossoms: 10 Irresistible Baking Secrets Revealed!
- Total Time: 25 mins
- Yield: 24 cookies 1x
- Diet: Vegetarian
Description
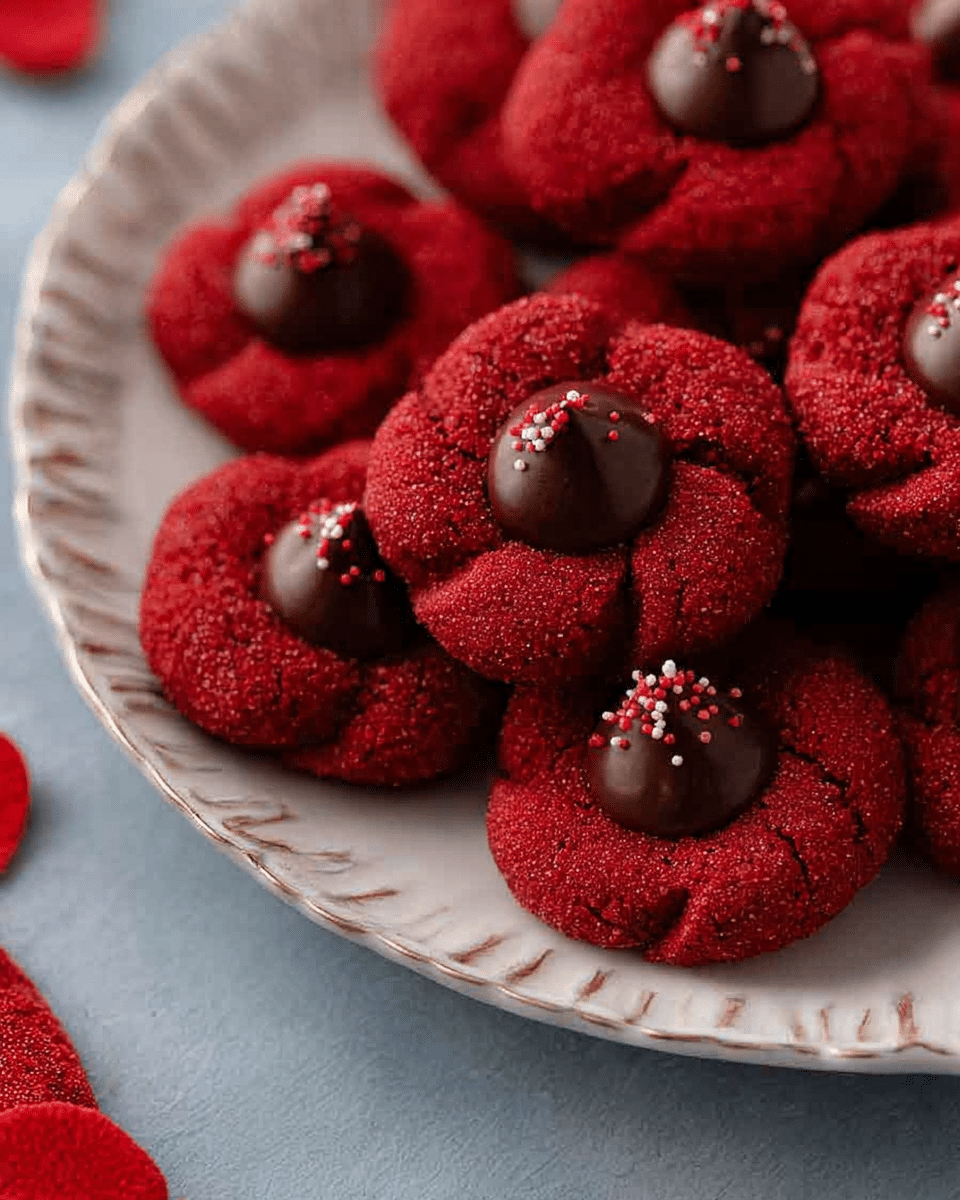
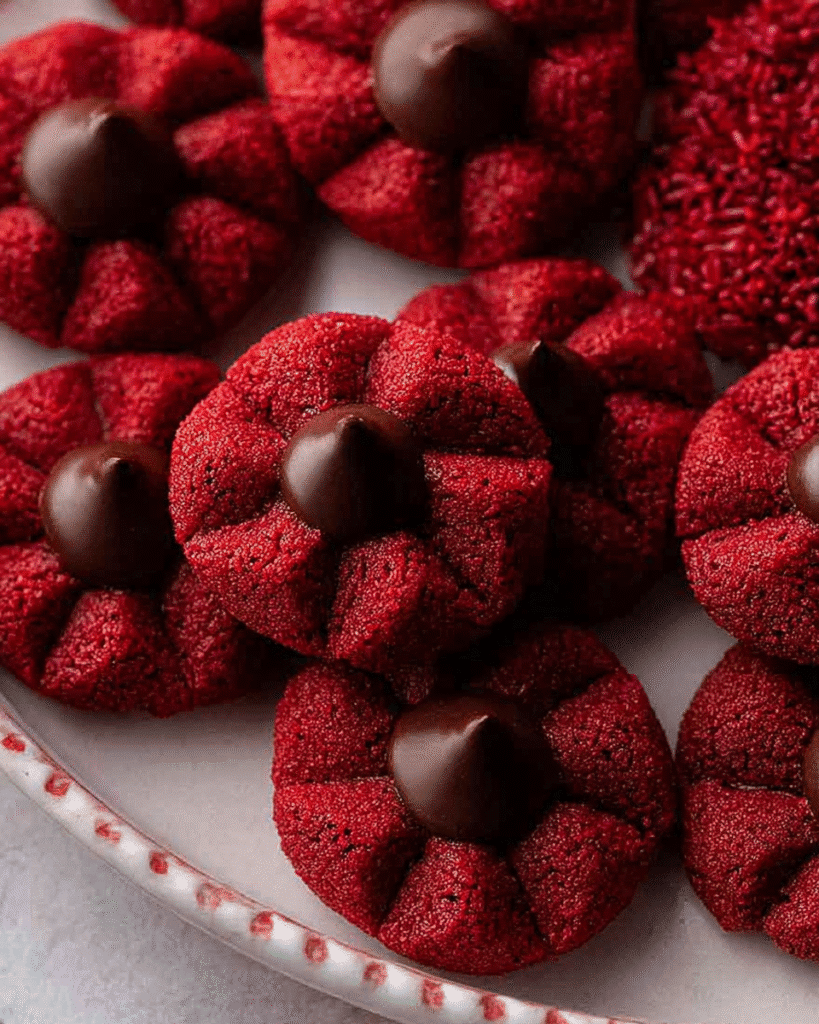
Soft, chewy red velvet cookies coated in sugar and topped with a classic chocolate kiss festive, eye-catching blossoms perfect for holidays, parties, or anytime a sweet treat is needed.
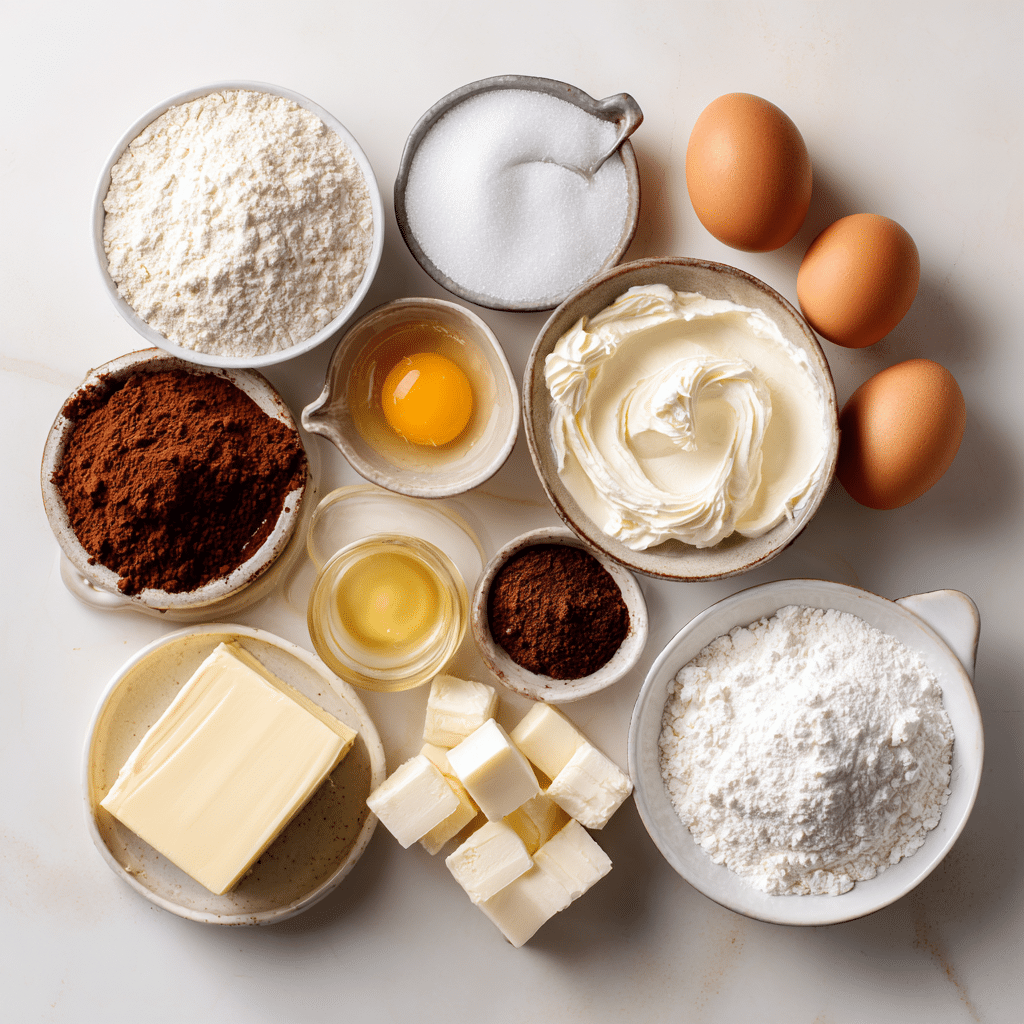
Ingredients
1 1/2 cups all-purpose flour
1/4 cup cocoa powder
1 tsp baking powder
1/4 tsp salt
1/2 cup unsalted butter, softened
3/4 cup granulated sugar
1 large egg
1 tbsp milk
1 tsp vanilla extract
1 tbsp red food coloring
1/2 cup granulated sugar (for rolling)
24 chocolate kiss candies, unwrapped
Instructions
1. Preheat oven to 350°F (175°C) and line baking sheets with parchment paper.
2. In a bowl, whisk together flour, cocoa powder, baking powder, and salt.
3. In another bowl, cream butter and sugar until light and fluffy.
4. Add egg, milk, vanilla, and red food coloring; mix until smooth.
5. Gradually add dry ingredients and mix just until combined.
6. Roll dough into 1-inch balls and coat each in granulated sugar.
7. Place balls on prepared baking sheets, spacing them apart.
8. Bake for 9–11 minutes until set but still soft.
9. Immediately press a chocolate kiss into the center of each cookie.
10. Allow cookies to cool on the baking sheet for 5 minutes before transferring to a wire rack.
Notes
Unwrap chocolate kisses before baking to save time.
For cleaner cracks, do not overbake the cookies.
Cookies firm up as they cool but remain soft inside.
- Prep Time: 15 mins
- Cook Time: 10 mins
- Category: Dessert
- Method: Baking
- Cuisine: American
Nutrition
- Serving Size: 1 cookie
- Calories: 160
- Sugar: 13g
- Sodium: 85mg
- Fat: 7g
- Saturated Fat: 4g
- Unsaturated Fat: 2g
- Trans Fat: 0g
- Carbohydrates: 22g
- Fiber: 1g
- Protein: 2g
- Cholesterol: 25mg
Keywords: red velvet blossoms, blossom cookies, chocolate kiss cookies, holiday cookies